Tuesday, June 25, 2013

Tasty Tuesday: Watermelon Pops

This week's tasty Tuesday post is fun and healthy.  I can barely keep them around when I make them at home and they're fun, easy and portable to take to games.  They're especially good for a hot day out on the fields.

Everything is better on a stick, right?  And these watermelon pops have a kick...a few extra electrolytes from a healthy dose of coconut water! 

Here's what you need - 

Team's Favorite Watermelon Pops


- Watermelon (I recommend seedless mini-melons for the perfect size triangles and density)
- Pure Coconut water - about 1c. 
- Flat popsicle sticks 


Step one:  Slice watermelon into 1/2 to 3/4 inch slices, and then each slice into 4 pieces (more if not mini-melon) leaving the rind on.


Step two:  Place tiny slices in middle of rind to prep for popsicle stick step.


Step three:  Arrange sliced watermelon in  container.  I recommend vertical, edge side down to help maximize space and help to soak in coconut water. 


Step four:  Pour coconut water into container over watermelon and soak.  I soaked about 20-30 minutes to avoid any breakage of the melon.  Test the length that you prefer.

Step five:  Place sticks in previously cut holes in the rind.


Voila - watermelon pops the team will love!

Happy snacking.

Wednesday, June 5, 2013

Tasty Tuesday: Celery Cups To-Go

So life happened and Tasty Tuesday is a little more like Tasty Wednesday this week.  Better delayed than never!

Today's Tasty Tuesday snack idea is a little fun, tasty, eco-inspired snack selection that's great for team snack.  There's always that fine line of balancing something the kids would like, with something that's fun and easy to transport.  And although not every sporting parent leans toward healthy snack options for team snack, it's nice to have a good healthy option in the repertoire. 


Celery Cups To-Go

What you'll need:

  • Peanut Butter or Sunflower Seed Butter (Tip: You should know and have posted publicly whether or not any kids on your team have food allergies.  Keep these allergies in mind when preparing snacks.)
  • Celery
  • Dried Cranberries, Raisins or Mini-Chocolate Chips (Optional)
  • Empty water bottles
  • Scissors
  • Baking pan 


Start by prepping your water bottle cups.  We all need a good use for those old bottles, right?  Cut the water bottles almost in half, or about 3.5 inches.  I eyeball it.  The bottom portion of your bottle will become your portable and disposable snack cup.  Wash and dry your cut plastic cups.  Set them aside.  (Tip:  Make sure the bottles you are using aren't sharp when cut.  The last thing you'll want is a sharp edge for the littles.  Most cut just fine, but it's best to test one and double check.  Clean cuts are important too.  Lastly, remember your bottle tops are still recyclable!)


Wash and chop the celery into sticks about a quarter to half an inch longer than the plastic cups.

Time to assemble.  I'm pretty sure you've probably got the idea of what to do from here, but let's go ahead and walk through this for giggles anyway. 

Place about 2tbs of nut butter in the bottom of each plastic cup.  If you're super picky about neatness, you could pipe the nut butter into the cups, but really, do we want to go through that extra step and mess if a spoon works just as well?  That's a judgment call for you.  Go with your preference.

Place the cut celery sticks in the nut butter toward the center of the cups.  It's oh so important at this point to make sure you put the same amount of sticks in each cup.  We wouldn't want any off the field challenges over who has the most snack!  Placing toward the center into the nut butter will help add stability for transporting to the game. 

Sprinkle about 1tsp of dried cranberries, raisins or mini-chocolate chips into the cup around the celery if you want to jazz the snack up a little. You want a little jazz that will stick to the nut butter surface, don't go crazy here with the dried fruit or add-ins.

Snacks are complete!  Yay!  Simple, easy and hopefully crowd pleasing for kids and parents alike.

 
Now to transport.  We've got a great disposable (still recyclable by the way) container to move our snacks.  But how do we take a tray of open snacks to a game?  Easy - grab a baking pan.  Something with about a two inch lip.  Think brownie or cake pan.  Arrange the cups side by side in the baking pan and cover tightly with plastic wrap to hold the celery in the cups.  Carry this tray stand alone or place atop some ice in a cooler with the juice boxes to keep cool on a hot day.  This easy travel method should ensure this yummy snacks makes it into the hands of eager players at the end of the game.


Happy bottle cutting!

And remember, drop me a note in the comments below on some fun ideas you'd like to see explored for team snacks.

Sunday, June 2, 2013

Lineup Organization

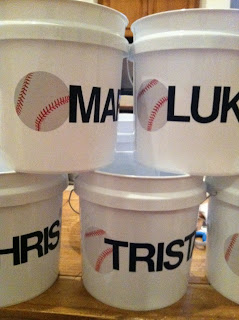
I originally posted this to Pinterest as an uploaded Pin not linking to anything.  It's been pretty popular so I'm dedicating a whole post just to this project.  Some really crafty mom somewhere down the line must have come up with this idea to help out her team coach.  I was lucky enough that that mom was in our little league and this phenomenon started the year before my oldest son started t-ball.  Thank you team mom, whomever you were! 

T-ball is a crazy year of baseball for kids and coaches.  The kids are so excited and amped up to be playing baseball.  They've got their new equipment - a shiny new bat, a new glove that they can barely close, a new helmet and probably their own softie ball with their name written on it in magic marker.  The coaches are in their new team shirt and are trying to capture at least 15 seconds of attention from each minute the kids are with them on the field.  And so the season begins.

One of the bigger challenges in t-ball (or any younger youth sport actually) is keeping the kids organized and ready to play.  With so many items to manage the t-ball bucket was born.  This nifty customizable project not only helps to carry all of the standard little things (hat, glove, helmet, water bottle) it also provides an extra spot to put the snack at the end of the game and helps keep the lineup straight for the coaches and dugout parent.

What you'll need:
  • 2 to 3 gallon painter's buckets (I found ours at Lowe's for about $3.50 each as well as other suppliers)
  • Letter stickers (all-weather variety works best to accommodate the wear and tear on the field.  I used letters meant for a mailbox that I found on sale)
  • Team color duct tape, or other adhesive decoration
  • Time


Get started by setting aside some time one evening, or weekend afternoon, before the season starts.  Let me just provide my one warning here - it's much much easier to do this project while the kids are in bed if you want to power through, but it can be fun for them to help spot letters if you need a time filler for their afternoon.

Arrange your supplies, pull up a comfy chair, pour a glass of your favorite beverage and turn on a show while you begin to assemble.  They will take a little time, but they are handy. 

Make sure your bucket is clean and ready for adhesive and then begin.

With all of the new fun duct tape out there, there's sure to be a color that goes well with your team colors.  You can add a little pop of color to the bucket with it by adding stripes, or wrapping the handle.


If you're lucky enough to have a team named after your local team, you'll probably have a good chance of finding decals in your team's emblem.  If not, and you're not happy with any tape you've found out there, try visiting your local scrapbooking store to look for stickers.  Sometimes just fun baseball stickers can spruce up the buckets.  You can also buy sheets of stickers for each kid on the team to decorate their own bucket after you've added their name.


These buckets not only keep the lineup in the dugout organized when placed in front of each players spot on the bench, they also help with warm ups and practices providing good visual aids for where the kids should line up, or a target to throw toward.


Have fun creating your own team buckets!  I would love to see how yours turn out or hear about any other ideas that you may have for this project, or other team organization projects.  Please post your comments below.

Tuesday, May 28, 2013

Tasty Tuesday: Simple Snack Cup

I'm a self declared super pinner...yep, I admit it!  I am a Pinterest addict still to this day.  A lot of great inspiration comes to me when perusing pins. 

Today's Tasty Tuesday team snack idea was inspired by a holiday pin where a mom made orange cups into jack-o-lanterns for Halloween.  That's awesomesauce right there - so simple, yet cute and creative!  We made quite a few of these gems and gave them away to toddler trick-or-treaters at our house this past Halloween.  See the original pin that inspired me here.

We're like 7 months past Halloween and not even planning 2013 costumes yet this year, why was this inspirational to me now for a team snack?  Easy - sharpies and fruit cups = fun ball style fruit cups.  I'm sure this isn't an original idea, but I haven't seen it anywhere yet.  It couldn't get much simpler than this and it's one even younger kids may want to help create.  Maybe set them up to create while mom puts her feet up for 5 minutes?  I'm sorry - I must have been daydreaming that idea...

Here is what you'll need.
- Fruit cups with clear tops (I have had best success buying these in bulk to get the clear top style)
- Sharpie or other permanent marker (Be sure not to use washable marker here or it will run once the fruit is chilled)


Pick fruit cups that match the color of the style of ball you plan to create.  Oranges or peaches are great selections for basketball themed cups and pears or applesauce are good choices for baseball themed cups.

Before the fruit is chilled, draw laces on top of the clear plastic with the appropriate color permanent marker.  You run the risk of ink not setting as well if you try to draw the lines on a cup that has been chilled and has some condensation.  Before chilling is the way to go.


Chill the fruit cups and serve.  Simple and fun!  These make great treats not just for game day snacks, but also for season end and sports themed parties.

Happy fruit cup decorating!

Monday, May 27, 2013

No Team Snack Drama

Why is it that when we become parents we become naturally more competitive?  My child learned to walk before yours, my son is reading three grade levels ahead of his age ... blah blah blah

I'd like to think that team sports, at least during the younger years, would be somewhat drama free territory.  Yeah right!  I was having a conversation with a good friend of mine during soccer season last year regarding snack expectations of other parents on their team.  You might think that they were expecting healthy organic options, but no that wasn't it.  The parents on the team weren't as much concerned about the nutritional value of the team snacks as they were the presentation of it.  See, the first two parents started the precedent of elaborately decorated goodie style bags, complete with toys and favors for team snacks.  We have come a long way from orange slices in a bucket, but do we have to go all of the way to elaborate gifts for snack time?  

My friend was explaining her dilemma of not being able to find just that right color of gift bag to use for snacks.  She had found some great ribbon, a fun (yet notably junkie) toy but needed a team color bag so she could decorate it with some stickers and have ready in time for the game.  Naturally, loving to help like I do, I started hunting for the gift bags for her.  Eventually between the two of us we found enough for every player on the team.  Whew!!  Train wreck avoided...or was it?

We were on a hunt because the parents expected it - the kids had gotten used to it.  But the kids just wanted a snack, plain and simple.

Here are some handy tips to help avoid snack drama and keeping it simple.

1) Bring some simple snack items to practices before snacks are expected and assignments for the season begin.  Keeping it casual at the start will help set the tone for the season.  

2) Once the season begins, assign yourself to the first snack duty for the team to set an example of what is good to bring.  Keep it casual, parents will follow your lead.

3) If you have a team website post examples of snacks that are good items to bring.  Be careful not to turn these examples into rules - nobody wants to be told exactly what to do.

4) Reserve special treats or toylike items for holidays during the season or a player's birthday. 


Setting an example for your team can go much further than you can imagine.  Doing so will help set expectations and keep your snacks on the drama free end of the spectrum.

Have you been caught in snack team drama?  Personalized cookies, over the top presentation?  Are you for or against - sound off below in the comments.  

Happy snacking! 

Thursday, May 23, 2013

Team Mom Philosophy

I felt it was worth doing a quick post on the basic Team Mom Philosophy and the background behind being a team mom.  

Whether you have been waiting for this moment your entire life or you were voluntold and assigned to the position, you need to keep the same end result in mind - make it fun for the kids and simple for the parents.  If you make this your mantra, you will make it through any season like a champ!

Don't get me wrong, if you're doing your job as team parent well, you will have moments of utter frustration but you will also have moments of a great sense of accomplishment.  

Basic rules to follow as you get started:

- Keep things simple
- Get organized and stay organized
- Keep an open line of communication with parents and coaches
- Be courteous (trust me sometimes this is easier said than done but you can do it!)
- Plan ahead 
- Make it fun!

If you do everything for your team with these principles in mind your team will be a happy team come the end of the season.  

Tuesday, May 21, 2013

Tasty Tuesday: Sweet Baseball Treat

As this blog gets under way, I'm striving to make every Tuesday a tasty one by posting snack and foodie ideas for team moms and team parents alike.

I do promise that I will have healthy snack posts as well, but today starts with a little tribute to baseball.  For much of the country baseball is just getting under way, for those of us on the west coast, baseball is just ending.  In this limbo area of seasons coming and going, why not post a fun cupcake idea?  Cupcakes are great for season end parties and are also fun treats for the team during the season.

This cupcake idea is one of my favorites.  You'll see a combo of two different cupcake decor ideas.  One was inspired by a pin on Pinterest using red M&Ms to create red baseball laces on white icing.  You can view the inspirational pin here.  I originally had the thought to just pick the red M&Ms out of a bag and keep the other colors for a sweet treat at home.  After that 5 second thought passed, I picked up a bag of only red M&Ms at my local party store.  These can also be found at many local candy stores.  (Side note, if you do feel you want to sort through the bag and pick the red ones out... consider picking the green ones out as well to create 'grass' cupcakes to go with the baseballs.)

Arrange the red M&Ms in an arc on each side of the cupcake to create a baseball effect.  Easy peasy!

But wait, that's not all.  What I really wanted to share was the fun cupcake topper idea we used for our end of season baseball party.  Surely someone on your team (most likely you if you're the team mom) has taken several pictures throughout the season.  A simple and inexpensive way to jazz up your cupcakes is to print an action photo of each player on a thick photo paper or card stock and cut around the edge of the shape.  Easily attach these to lollipop sticks with a small dab of hot glue and voila - you've got cute, action packed cupcake toppers that the team will love.  Each player will enjoy finding their picture and eating the cupcake attached to it.

Have fun spicing up your team's cupcakes.


Here's another fun action shot atop a cupcake from a soccer season as well.

Sunday, May 19, 2013

Getting Started and Staying Organized (Part 1)

There are a few good tools out there for team moms (and if I can digress here for a moment, I could go with "team parents" if I'm going to be PC...but hopefully any team dads or coaches out there reading this will affectionately know that I care for you as well but will refer to you as a mom more than likely in my posts.  Sorry, you're just going to have to deal with it.)  So back to the tools...  There are some good tools and organizational sites out there now for organizing teams.

Today I'm going to highlight Shutterfly.com and their share sites.  I have personally used Shutterfly share sites for multiple sports teams, and actually liked them so much that I started a personal one to share information on our family with family and friends.  Naturally I would pick this site service to share with you first since I am fond of it.  But hey, don't get me wrong, it has it's quirks and little things I'd like to fix, just like most things in life, but overall they are worth checking out.


Some positives about Shutterfly -

It's free. Seriously, need I say more?

There's a convenient app for share sites specifically that can be downloaded to your smart phone.

The calendar and snack schedule are easily downloaded to a smart phone calendar.

They are super easy to customize.  They offer a step by step setup wizard or you can go rogue and design on your own.  I'd lie if I said I didn't go rogue.


There are several colors and styles to choose from.  This is both a positive and a negative in my book.  There are several preset color and style templates, however, the selection needs to be a little more robust for this bells and whistles mom.


Functionality.  There is a tab and a box to contain anything and everything you would want to include on your site. There is a roster, availability chart, snack schedule (where you can easily assign people or have them sign themselves up (but really, just sign them up...more on that in a later post I'm sure), the schedule, a tile for weather, the homepage with a picture of the week and score tally - and much more.  And the best part?  All of these are optional!  Add or remove those features that fit your team's style and needs.

And of course what is Shutterfly best known for? No, not the cool Christmas and Holiday cards they have, but pictures - hello!  Shutterfly share sites are designed with pictures in mind.  It is easy for families to upload pictures and other families to download those pictures if there happens to be a great shot of their All-star making a fabulous play at third, or chasing butterflies in right field.

Best of all this site is protected!  It's available to members and invitees only.  Just make sure to offer up membership to those important people in your team players' lives... including doting grandparents.


What are my share site pet peeves you ask?  There aren't many (yet) but my biggest pet peeve with the site is the communication piece and e-mailing.  When you check a box that says 'do not e-mail' or if you uncheck a box that says 'e-mail all site members' you'd expect that they wouldn't be e-mailed, right?  Or is that just me?  Well it's a safe bet that all members on your site will be e-mailed when you change or update anything on the site.  That my friends is annoying.  **sigh**

Check out Shutterfly share sites if you are new to Team Mom duty... you won't go wrong.

Tuesday, May 7, 2013

Neglected no more - Team Moms have a resource!

After scouring web pages and blogs high and low to find tips and ideas for team moms, I kept finding I was disappointed that there wasn't one solid resource I could turn to for ideas, or to share my stories and frustrations.  I mean let's face it, team mom is not an easy gig and the salary is usually paid with under appreciation and stubbornness.  Have no fear - this blog will be your one stop shop for all things team mom related.  Tips, tricks and hopefully fun stories!  If you have questions or would like to see a post on a specific topic, please feel free to leave me a comment or send a message.