Tuesday, June 25, 2013

Tasty Tuesday: Watermelon Pops

This week's tasty Tuesday post is fun and healthy.  I can barely keep them around when I make them at home and they're fun, easy and portable to take to games.  They're especially good for a hot day out on the fields.

Everything is better on a stick, right?  And these watermelon pops have a kick...a few extra electrolytes from a healthy dose of coconut water! 

Here's what you need - 

Team's Favorite Watermelon Pops


- Watermelon (I recommend seedless mini-melons for the perfect size triangles and density)
- Pure Coconut water - about 1c. 
- Flat popsicle sticks 


Step one:  Slice watermelon into 1/2 to 3/4 inch slices, and then each slice into 4 pieces (more if not mini-melon) leaving the rind on.


Step two:  Place tiny slices in middle of rind to prep for popsicle stick step.


Step three:  Arrange sliced watermelon in  container.  I recommend vertical, edge side down to help maximize space and help to soak in coconut water. 


Step four:  Pour coconut water into container over watermelon and soak.  I soaked about 20-30 minutes to avoid any breakage of the melon.  Test the length that you prefer.

Step five:  Place sticks in previously cut holes in the rind.


Voila - watermelon pops the team will love!

Happy snacking.

Wednesday, June 5, 2013

Tasty Tuesday: Celery Cups To-Go

So life happened and Tasty Tuesday is a little more like Tasty Wednesday this week.  Better delayed than never!

Today's Tasty Tuesday snack idea is a little fun, tasty, eco-inspired snack selection that's great for team snack.  There's always that fine line of balancing something the kids would like, with something that's fun and easy to transport.  And although not every sporting parent leans toward healthy snack options for team snack, it's nice to have a good healthy option in the repertoire. 


Celery Cups To-Go

What you'll need:

  • Peanut Butter or Sunflower Seed Butter (Tip: You should know and have posted publicly whether or not any kids on your team have food allergies.  Keep these allergies in mind when preparing snacks.)
  • Celery
  • Dried Cranberries, Raisins or Mini-Chocolate Chips (Optional)
  • Empty water bottles
  • Scissors
  • Baking pan 


Start by prepping your water bottle cups.  We all need a good use for those old bottles, right?  Cut the water bottles almost in half, or about 3.5 inches.  I eyeball it.  The bottom portion of your bottle will become your portable and disposable snack cup.  Wash and dry your cut plastic cups.  Set them aside.  (Tip:  Make sure the bottles you are using aren't sharp when cut.  The last thing you'll want is a sharp edge for the littles.  Most cut just fine, but it's best to test one and double check.  Clean cuts are important too.  Lastly, remember your bottle tops are still recyclable!)


Wash and chop the celery into sticks about a quarter to half an inch longer than the plastic cups.

Time to assemble.  I'm pretty sure you've probably got the idea of what to do from here, but let's go ahead and walk through this for giggles anyway. 

Place about 2tbs of nut butter in the bottom of each plastic cup.  If you're super picky about neatness, you could pipe the nut butter into the cups, but really, do we want to go through that extra step and mess if a spoon works just as well?  That's a judgment call for you.  Go with your preference.

Place the cut celery sticks in the nut butter toward the center of the cups.  It's oh so important at this point to make sure you put the same amount of sticks in each cup.  We wouldn't want any off the field challenges over who has the most snack!  Placing toward the center into the nut butter will help add stability for transporting to the game. 

Sprinkle about 1tsp of dried cranberries, raisins or mini-chocolate chips into the cup around the celery if you want to jazz the snack up a little. You want a little jazz that will stick to the nut butter surface, don't go crazy here with the dried fruit or add-ins.

Snacks are complete!  Yay!  Simple, easy and hopefully crowd pleasing for kids and parents alike.

 
Now to transport.  We've got a great disposable (still recyclable by the way) container to move our snacks.  But how do we take a tray of open snacks to a game?  Easy - grab a baking pan.  Something with about a two inch lip.  Think brownie or cake pan.  Arrange the cups side by side in the baking pan and cover tightly with plastic wrap to hold the celery in the cups.  Carry this tray stand alone or place atop some ice in a cooler with the juice boxes to keep cool on a hot day.  This easy travel method should ensure this yummy snacks makes it into the hands of eager players at the end of the game.


Happy bottle cutting!

And remember, drop me a note in the comments below on some fun ideas you'd like to see explored for team snacks.

Sunday, June 2, 2013

Lineup Organization

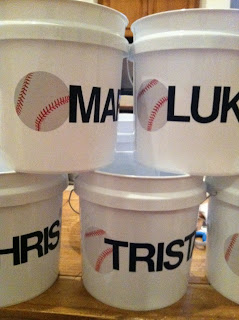
I originally posted this to Pinterest as an uploaded Pin not linking to anything.  It's been pretty popular so I'm dedicating a whole post just to this project.  Some really crafty mom somewhere down the line must have come up with this idea to help out her team coach.  I was lucky enough that that mom was in our little league and this phenomenon started the year before my oldest son started t-ball.  Thank you team mom, whomever you were! 

T-ball is a crazy year of baseball for kids and coaches.  The kids are so excited and amped up to be playing baseball.  They've got their new equipment - a shiny new bat, a new glove that they can barely close, a new helmet and probably their own softie ball with their name written on it in magic marker.  The coaches are in their new team shirt and are trying to capture at least 15 seconds of attention from each minute the kids are with them on the field.  And so the season begins.

One of the bigger challenges in t-ball (or any younger youth sport actually) is keeping the kids organized and ready to play.  With so many items to manage the t-ball bucket was born.  This nifty customizable project not only helps to carry all of the standard little things (hat, glove, helmet, water bottle) it also provides an extra spot to put the snack at the end of the game and helps keep the lineup straight for the coaches and dugout parent.

What you'll need:
  • 2 to 3 gallon painter's buckets (I found ours at Lowe's for about $3.50 each as well as other suppliers)
  • Letter stickers (all-weather variety works best to accommodate the wear and tear on the field.  I used letters meant for a mailbox that I found on sale)
  • Team color duct tape, or other adhesive decoration
  • Time


Get started by setting aside some time one evening, or weekend afternoon, before the season starts.  Let me just provide my one warning here - it's much much easier to do this project while the kids are in bed if you want to power through, but it can be fun for them to help spot letters if you need a time filler for their afternoon.

Arrange your supplies, pull up a comfy chair, pour a glass of your favorite beverage and turn on a show while you begin to assemble.  They will take a little time, but they are handy. 

Make sure your bucket is clean and ready for adhesive and then begin.

With all of the new fun duct tape out there, there's sure to be a color that goes well with your team colors.  You can add a little pop of color to the bucket with it by adding stripes, or wrapping the handle.


If you're lucky enough to have a team named after your local team, you'll probably have a good chance of finding decals in your team's emblem.  If not, and you're not happy with any tape you've found out there, try visiting your local scrapbooking store to look for stickers.  Sometimes just fun baseball stickers can spruce up the buckets.  You can also buy sheets of stickers for each kid on the team to decorate their own bucket after you've added their name.


These buckets not only keep the lineup in the dugout organized when placed in front of each players spot on the bench, they also help with warm ups and practices providing good visual aids for where the kids should line up, or a target to throw toward.


Have fun creating your own team buckets!  I would love to see how yours turn out or hear about any other ideas that you may have for this project, or other team organization projects.  Please post your comments below.